Hey All,
Logwriter here! How are you?
More than ever, the parts of a data center are seamlessly integrated within each other. This integration helps IT professionals get their jobs done faster, which saves time and money.
Some parts have a stronger dependency between each other. For example, a database cannot store data without a place to write it down.
Since we are talking about integration, it would be helpful for a database administrator(DBA) to understand what kind of features a storage system can offer for his databases. I’m not saying that a DBA should be an expert about storage systems, but if he knew about the features that a storage system can offer for him, his work would be done faster and easier.
NetApp All-Flash FAS (AFF) systems can offer features like triple parity RAID protection, Snapshot®, FlexClones®, in-line deduplication, in-line compression, compaction, encryption and replication. It can offer all these features without impacting the performance of your applications.
MongoDB is an enterprise NOSQL database. It has been used by companies like Metlife, CitiGroup, eBay, McAfee and Adobe to support their third generation applications.
Here is what I’ll cover during this series of posts:
- Part 1 will cover “Choosing a protocol” and “Volume/LUNs layout”.
- Part 2 will cover “WiredTiger and Its Write Path” and “Backup using Snap Creator”
- Part 3 will cover “Restoring your MongoDB Replica Set using Snap Creator”
- Part 4 will cover “Storage Efficiency and MongoDB”
- Finally, Part 5 will cover “MongoDB Performance on ONTAP 9.0”
If you are a MongoDB DBA or a storage systems administrator that needs to deploy a MongoDB database environment, let me share with you some tips about how to deploy a MongoDB database on NetApp AFF system and what it can do for you.
Choosing a Protocol
NetApp AFF system is a multiprotocol storage solution. It can talk FCP, iSCSI, NFS and CIFS simultaneously if you need it.
According to the MongoDB 3.2 manual – Production Notes, NFS is not recommended for MMAPv1 and it can be used for WiredTiger but you should expect a lower performance.
Before the SSD drive’s age, the bottleneck of a storage system was disk I/O. HDD drives used to deliver a higher and unpredictable latencies. With the advent of SSD drives, the I/O layer was vanished from the bottleneck area.
NetApp ONTAP operating system has been improved to work with SSD drives and as a multiprotocol storage system it allows you to design your environment without worry about which protocol will support your application.
ONTAP presents a small difference in performance between FCP and NFS, where FCP shows a better throughput (IOPS) at the same latency as NFS, but it would matter only for applications like trading from the stock market world where every microsecond counts.
Volume & LUN Layout
Your volume/LUN layout decisions can affect two important factors of your MongoDB environment: Storage Efficiency and Performance.
MongoDB uses replica sets to provide protection and high availability of its data. It means, if we assume you have the most traditional mongoDB cluster topology, you’ll end up with 1 primary server and 2 secondary servers.
Considering the topology mentioned above, if your database size is 1TB you’ll need 3 TB of space to deploy your database. The primary data (1TB), plus 2 copies (1TB + 1TB).
NOTE: WiredTiger provides compression and you could save some space using it, but I’m not taking it into account to make the example easier to follow.
Knowing about NetApp storage space efficiency and how it works, you would be inclined to create one volume with 3 LUNs on it and you’d map one LUN for each server. Check out figure 1.

Figure 1. Volume/LUN layout – single volume
Well, it’s the most efficient way to achieve the best storage space efficiency, since 3 copies of the same data reside on the same volume, but it isn’t the best flexvol design for performance.
Figure 1 shows that your ONTAP cluster is an HA-Pair, so it’s made of 2 nodes. Each node has a data aggregate (node1 has n1_aggr1 and node2 has n2_aggr1), so if you create a single volume on n1_aggr1 you’re using only half of the compute resources(CPU, cache, network) available in your ONTAP cluster.
Let me show you a similar volume/LUN layout that will fit a like a charm on both buckets: storage efficiency and performance.
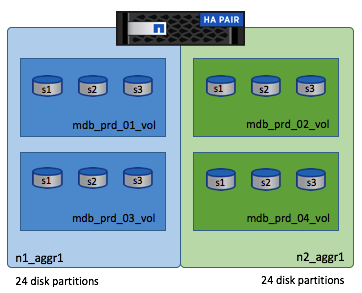
Figure 2. Volume/LUN Layout – Multiple volumes/LUNs
Figure 2 shows a volume/LUN layout where you’re allowing your MongoDB database to have access to all the compute resources (CPU, memory, network) available in your ONTAP cluster.
- Explaining how to spread your database across multiple volumes
Instead of create a single 3TB flexvol as shown in figure 1, let’s try the multiple volumes/LUNs approach (figure 2)
a) divide 3TB by 4 flexvols to have the volume capacity. It gives you 768GB per flexvol.
b) on each flexvol you will create 3 LUNs of 250GB each.
c) map one LUN of each flexvol to one server. It gives a total of 4x 250GB for each server (1 TB)
d) using LVM on your servers, you have to create a Volume Group composed of 4x 250GB LUNs and then create a striped Logical Volume where the number of stripes is equal to the number of LUNs (–stripes 4) and the stripe size is 4KB (–stripesize 4K)
Applying a volume/LUN layout of multiple volumes/LUNs you’re maximizing your storage space efficiency savings and performance of your MongoDB database.
On the next part of this series you will learn how to backup/restore and clone a MongoDB database using powerful and amazing features available through your ONTAP cluster.
Stay tuned !
